
Because I don’t like wearing a bra under crocheted garments, I thought of making pockets in crocheted bras as well as crocheted tops and dresses where bra inserts or pads may be placed. I also decided to crochet the bra inserts because they are very difficult to find the in the shops.
I started with an experiment with a sleeveless motif top. I thought of making bra cups and sew them to the inside of the garment (below photo).

But I also wanted to use bra inserts. So what I did was get the bra inserts from the shop, but how to put them onto the garment? I didn’t think it was a good idea to put the bra inserts between the bra cups and the garments (below).

So I decided to crochet a bra cup and sew that to the bra inserts and then sew the covered bra inserts to the garment, photos below.


Today, I crocheted another bra following this quick and easy bra pattern. Then I decided to make my own bra inserts. I want removable bra inserts. So I made a second bra cup and sewed that to the underside of the bra with a gap where the bra inserts can be inserted.
Below are the photos showing the bra pattern and the process.
 |
| This is the pattern for the bra band. |
 |
| Here is the pattern for the bra cup. Make two of these. |
 |
| Here is the assembly guide for the crocheted bra. |
 |
| First, I made this bra using 3mm hook and 4-ply cotton yarn, very soft beautiful yarn, following the pattern shown above in three illustrations. |
 |
| Next I made these bra inserts using 4.5mm hook and worsted weight acrylic yarn. This yarn is more stiff so it keeps the shape of a dome. The pattern for this is very simple, it is just ch 6, join with sl st to make circle, 6 sc in ring, join with sl st to first sc. Then make more rounds of 2 sc in first sc, 1 sc in next sc, so that there is an increase to make the dome shape. When I reach round 5, I make 1 sc in each sc, up to round 6. It is really up to you what size and shape you want to make your bra inserts. You must simply remember your pattern so that you can repeat exactly the same for the second bra insert. |
 |
| After making two bra inserts, I make the bra pocket. I made this using 3mm hook and 3-ply cotton yarn, a bitter thinner than the yarn I used for the bra, and this is much softer. If you don’t like to crochet this pocket, you can always get a fabric and sew that to the underside of the cup with an opening. |
 |
| Here is a pocket sewn to underside of the bra cup, showing the opening at the side. This is where the bra insert is inserted. |
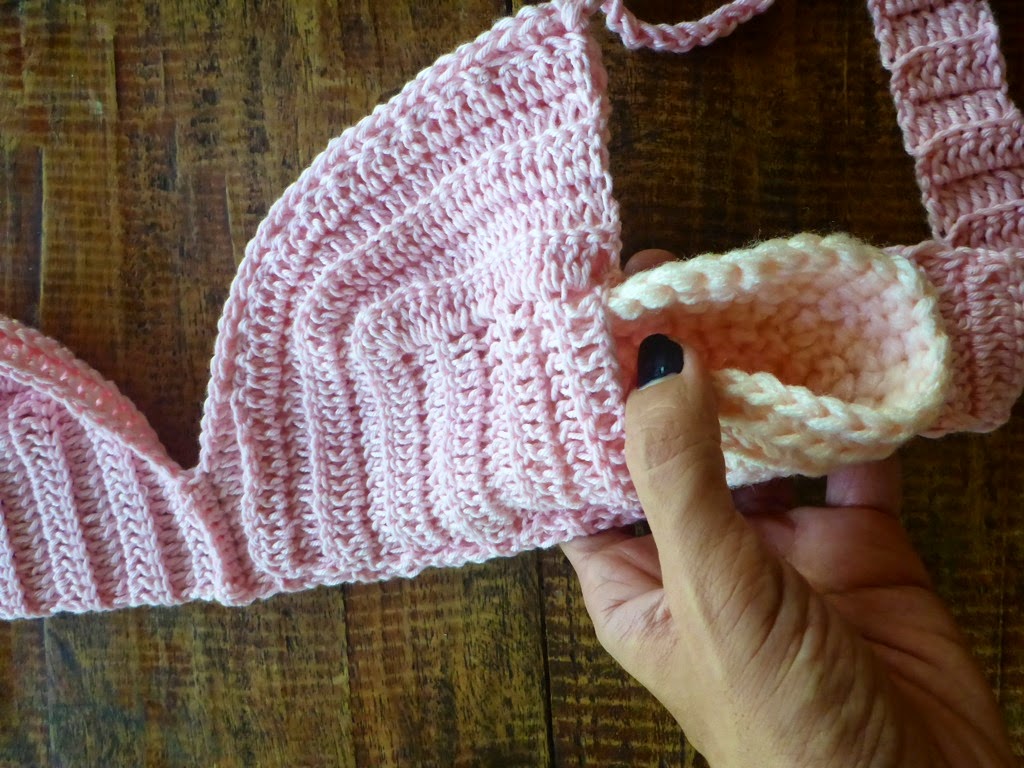 |
| Here, the bra insert is inserted. You can remove the bra insert when you wash the bra. |
 |
| And here is the finished bra! I think that this basic design is also good for making dresses with a structured bodice. Something to try next time. |
Update:
I made another bra in beige colour. But this time I didn’t want to tie at the neck so I used a button so that the halter strap can be adjusted to fit. Progress photos below.
 |
| Start with two bra cups and join at the tips. |
 |
| Crochet the bra straps along the side of the cups. |
 |
| Crochet the halter strap, joining at the top of one cup. |
 |
| I sewed a button on the underside of the bra. So the halter strap can be adjusted to fit. |
 |
| This is what the bra looks like reversed, with the little button at one side. |
Thank you for your idea and the wonderful pictures.
ReplyDeleteSharonK - a 9 year breast cancer survivor diagnosed with a new tumor in the same breast yesterday. Biopsy results by November 5th.
You're welcome Sharon. I hope your test results are negative, that you'll be fine. I had a biopsy when I was 20 which returned negative. 25 years later, there are many little ones, hopefully all benign. I hope yours are benign too. Take care, love, Fatima
Delete