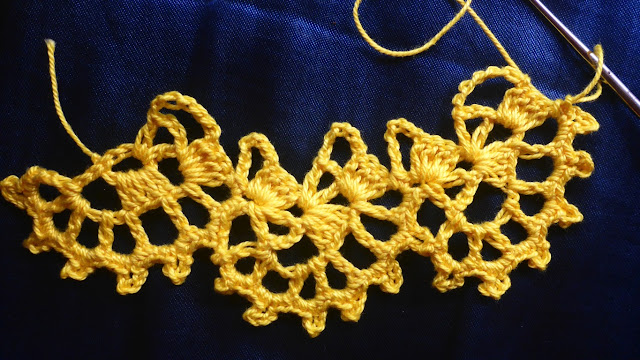
Here's a dainty little lace called "Mimosa Edging" from "The Home Art Crochet Book" edited by Flora Klickmann. The book is available freely at The Antique Pattern Library. The edging is found on page 3, Section I, Edgings for the Average Worker.
I reproduce the original antique pattern here and provide a version I have edited for the modern crocheter. For the sample shown, I used crochet cotton thread size 8 and steel hook size 1.2mm.
Mimosa Edging
UK crochet terminology
First Scallop:
Row 1: Ch 7, and join in a ring. Ch 7, 4 tr into the ring, ch 3, 1 tr into ring, ch 3, 1 tr into ring. Ch 7, turn.
Row 2: 4 tr into second sp, ch 3, 1 tr into same sp, ch 3, 1 tr into first of 4 tr in previous row, ch 3, 1 tr into the last of the 4 tr in previous row, *ch 3, 1 tr into the loop at the end of the previous row, rep fr * three more times (making 4 times in all). Turn.
Row 3: *2 dc, ch 5, 2 dc into first sp formed by 3-ch in previous row, rep fr * into each of the next 6 sps. The last little 5-ch picot loop forms the ring for the commencement of the next scallop.
Succeeding Scallops:
Row 4: Ch 7, turn, 4 tr into last 5-ch picot loop, ch 3, 1 tr into same loop, ch 3, 1 tr into same loop. Ch 7, turn.
Row 5: 4 tr into second sp. ch 3, 1 tr into same sp, ch 3, 1 tr into same sp, ch 7 turn.
Row 6: 4 tr into second sp, ch 3, 1 tr into same sp, ch 3, 1 tr into first of 4 tr in previous row, ch 3, 1 tr into the last of the 4 tr in previous row, *ch 3, 1 tr into the loop at the end of the previous row, rep fr * three more times (making 4 times in all). Dc into nearest picot from previous scallop to join (shown in photo below). Turn.
Row 7: Rep row 3.
Rep fr Row 4 to desired length.
Finishing:
To Form the Edge for Sewing On
When the work is the required length, make 7 ch and alternately, 2 tr and 2 dc into each of the loops at the lower edge of the pattern: the double to go into the long loops and the trebles into the alternate short loops.


Comments
Post a Comment