
From Harvey, Lula M. Priscilla Irish Crochet Book No 1, A Collection of New and Original Designs, With Stitches and Lessons for Working. Boston: Priscilla Publishing, 1912, 48 pgs. (Scans donated by Judith Adele, edited by Judith Adele, 2006.) The book may be found at The Antique Pattern Library.

I gave the pattern a try and was able to make a necklace from the motifs. If you would like to make the pattern, this can be the opportunity to learn Irish Crochet.
I suggest that you download the whole book and learn the basic techniques described at the beginning of the book. The book is available in the website mentioned above, in four parts.
For the blackberry design, I find that two techniques in Irish crochet need special attention: the Clones Knot and the use of the Padding Cord (or “pc”).
 |
| The finished necklace. A closer look at the clones knots of the berries. |
A few years ago, I gathered some information about making the Clones knot which you may find at this page. Different techniques work for different people, but personally, the technique that I learned from reading Lula Harvey’s book remains the best as it lets me make the knots without trouble every time.
Now, the use of the padding cord is another technique that requires a lot of practice. For the necklace here, I used two kinds of padding cords: one is the same cotton 10 thread wound six times, and the other is cotton 8 thread wound four times. You can use other cord or thread as padding cord, preferably one that is the same colour as your working thread.
 |
| Based on the pattern “A blackberry design” by Lula Harvey. Here, I try to make a variety of arrangements with the motifs. |
Crochet the Motifs then Make an Arrangement with Them
So I made the motifs, a couple of each, then made an arrangement with them. I came up with all sort of arrangements, following what I thought were basic organisational principles to achieve a pleasing layout.
Often, I make the layout and derive a function from them. Sometimes, I have a function in mind (such as a purse) and make the layout from it. More often that not, the layout determines what will come out of the design.
It is possible, of course, to be more determined by the function of the object that one is aiming to make. It’s just that I have no fixed assignment or duty or output, so I can play around a bit with the motifs and let the arrangements be what they would like to be.
 |
| The motifs are needle joined. |
At some point, I start to join the motifs. I selected needle joining, that is, sewing the motifs together at the back, instead of joining and filling in with crochet meshes. I thought that the piece I was making will be small and will most probably be a piece of jewellery.
While needle-joining, the arrangement of the motifs change again. As the motifs join and take shape, some logical arrangements become apparent, and I tend to follow that logic.
At this point, I knew that the piece would be a necklace. After needle joining, I sewed two black satin ribbons to the ends of the necklace. I also sewed the ends of the ribbons to finish.
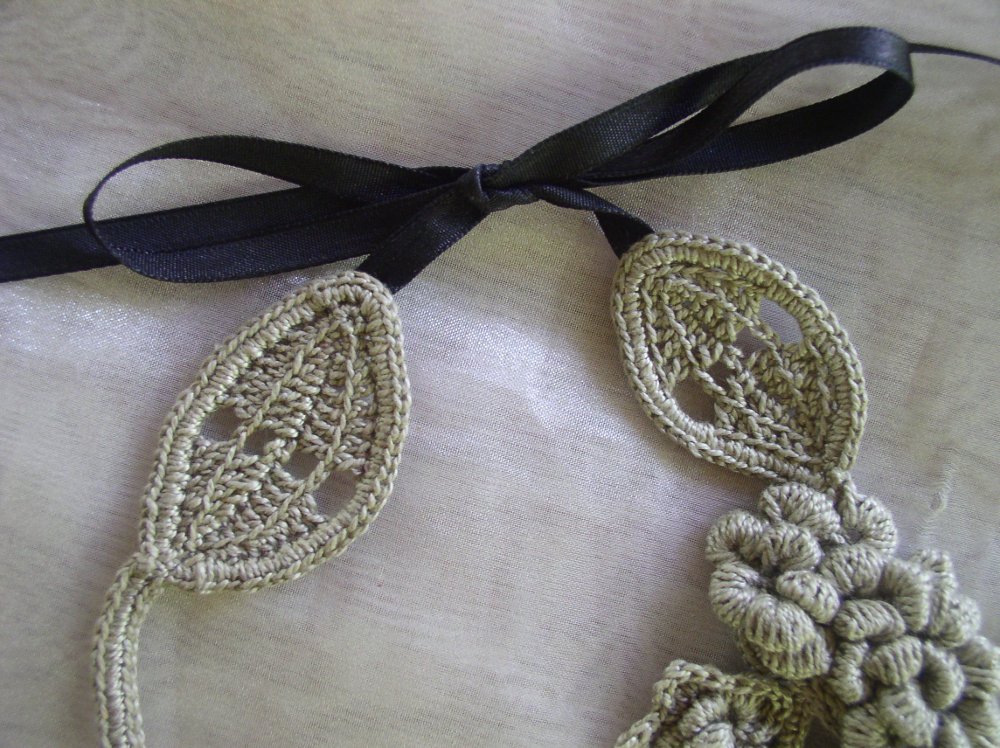
 |
| Black satin ribbon is sewn to the ends of the motifs. |
So here (below) is the pattern instructions for The Blackberry Design as written in Lula Harvey’s book, “Priscilla Irish Crochet Book 1″. Do not be afraid to improvise. I improvised considerably with the pattern, especially the berries with stems and a little bit with the flowers.
Once you understand how Harvey proposes that the motif be constructed, then you can make improvisations. Look at the photos in the book and compare with the written pattern instructions.

A Blackberry Design
(Pattern is written in UK crochet terminology)
Black Berry Design – Leaves:
Leaves, Figure 47: Make a chain of 18 sts, turn, miss 1, 1 dc in each of 2 sts, 1 htc in each of next 2 sts, 1 tc in next 3 sts, ch 2, miss 2, 1 tc in next 4 sts, 1 htc in next 2 sts, 1 dc in each remaining st to end, 3 dc in end st; work up the other side of centre ch in the same way, putting a dc in each st with a dc, htc, with htc, etc.
2d row- *One dc in 1st 3 sts (working only in the back loops), 1 htc in next 2 sts, 1 tc in each st to 2 ch, ch 3, miss 2 ch, 1 tc in next 4 sts, 1 htc in next 2 sts, 1 dc in each st to end, 3 dc in end st; repeat from * until the leaf has 4, 5 or 6 open holes, according to the size of leaf you wish to make. Then join in the pc and work dc all around the edge of leaf, putting 2 dc in every 2d st to cover the cord nicely. Work a few dc over the cord for stem.
Figure 47. Berries- Chain 10, take a piece of pc and work 1 dc over 1 strand of the cord, about 2 inches from the end; then working over both strands of cord, work 1 dc in each st of 10 ch, (ch 7, 1 dc over the cord, pull cord until it is a little shorter than the 7 ch, 1 dc in each st of ch), 3 times, ch 12, 1 dc on cord, turn and work 1 dc in each of 12 sts of ch; work 2 dc between each little stem, catch back with a sl st to the top of last stem, 1 dc in 1st stem; then work dc over the cord alone for a short stem. Now work 2 dc in the long stem of 12 dc, (ch 1, 2 dc in next stem), 4 times, turn, ch 5, and on the 5 ch work a Clones knot of 20 overs, 1 dc in the 1st stem, a Clones knot, 1 dc in the next space; repeat across, making 1 dc in each space, and 1 in the first and last stem. Chain 14, carry the chain across back of work, catch in the side of berry beside 1st knot; work 4 or 5 more rows of knots, putting dc between the knots of last row. The small berries have only 4 little stems instead of 5.
The Round Berries having no stems, are begun in the centre and are worked round and round, instead of going across. Chain 5, a Clones knot of 20 overs, 1 dc in 1st st of chain, (ch 4, a knot, 1 dc in same st with last dc), 3 times; continue working round and round, putting the dc between the knots of previous round until the berry is as large as desired.
Figure 48. Flowers- Chain 5, a Clones knot of 12 overs, 1 dc in 1st st of ch, (ch 4, a knot, 1 dc in same st with last dc), twice, ch 4, 1 dc in same st with last dc, ch 3, 1 dc in same place, (ch 3, 1 dc between next 2 knots), twice, ch 3, 1 dc in 1st of 4 ch; now in each of the ch loops around knots work as follows: 1 dc, 2 tc, 5 dtc, 2 tc, 1 dc, all in one loop; repeat 4 times more.
Figure 48.-For the stem: With p on both sides. *ch 12, p, repeat until as long as required, join in the cord and work dc with p covering the cord closely. Arrange the different parts as desired, joining them neatly together with needle and thread.
Some of my notes in making the Blackberry Design:
It takes quite a bit of time and concentration, especially the berries with the stems. I worked on it last night and kept at it till I understood what Harvey was talking about.
My problem was that the stitches in the book was turning out so small I couldn’t see exactly what sort of construction was supposed to happen. Sometimes, I read the instructions and crochet at the same time if plain reading doesn’t help.
In this case with the berries, plain reading helped the third time. I finally understood that the idea was to make the stems then to make the first row of berries over the stems, then make chains at the back of the berries, where the next row of berries with be worked onto, and so on.
It took a while because I was conditioned by the way the flower was constructed, with the knots worked in the round! The berries with stems was worked in rows.
 |
| Based on the pattern “A blackberry design” by Lula Harvey. Here, I try to make a variety of arrangements with the motifs. |
 |
| Expermenting with arrangement of the motifs. |
 |
| Expermenting with arrangement of the motifs. |
 |
| A closer view of the berries. |
 |
| A closer view of the leaf motif. I added a sc around each petal, with sl st between the petals. |
 |
| A closer view of the leaf motif. |
 |
| The finished necklace. Worked in cotton thread size 10 and 0.95mm steel hook. |
 |
| The finished necklace. A closer look at the clones knots of the berries. |
 |
| The finished necklace. A closer look at motifs. |
 |
| The finished necklace. A closer look at motifs. |
 |
| Black satin ribbon is sewn to the ends of the motifs. |
 |
| The motifs are needle joined. |
 |
| The motifs are needle joined. |
Comments
Post a Comment