Apart from crocheting, I’ve grown to love sewing. My projects are simple dresses, blouses and skirts. I only sew by hand, I don’t use a sewing machine. I don’t use sewing patterns, I just use a garment as model. I trace around the garment onto the fabric or I trace over a sheet of paper. Then I improvise from that.
MY HAND-SEWING PROJECTS (Dresses)
Lately, I started sewing by hand. I love it - it is meditative and relaxing. I love going to the fabrics shop, looking for beautiful fabrics to work with. My very first sewing project was a dress. I used an old dress (a favourite of mine) which I got from a second-hand clothes shop as model. I placed the dress over my fabric and traced all around it. I didn’t have a tailor’s chalk. I just used a felt-tip pen. I made three dresses from this method. Soon I got some Manila paper and traced over it and cut it as my pattern. I modified the design by modifying this paper pattern. However, recently I have found it easier to create the design directly on the fabric I am working with.

Here is my first hand-sewn dress (above). I love this fabric of paisley pattern, absolutely beautiful. I searched the shops for paisley pattern fabrics and found only two that I really liked, this one in blue and the other one in red. I did my best to sew this dress as neatly as possible, including the seams on the wrong side of the dress. Everything has to be done neatly otherwise the fabric will fray and the dress will be ruined.
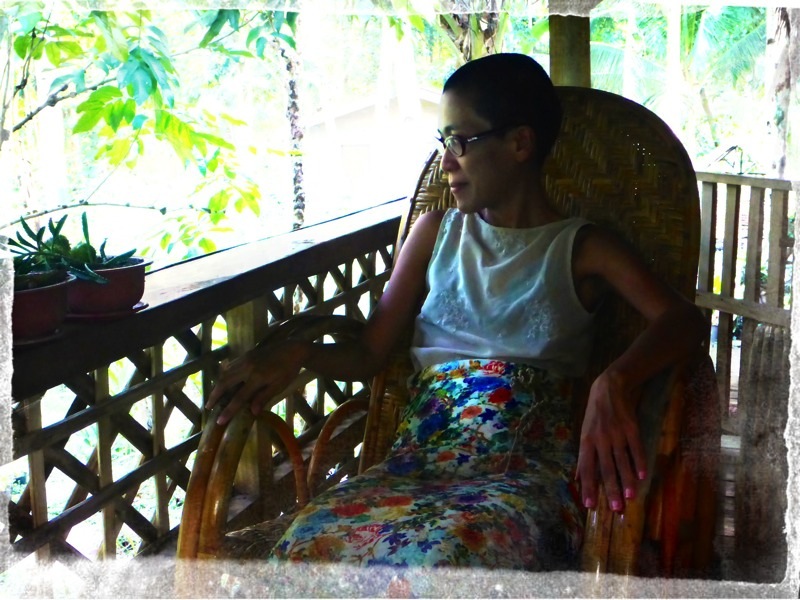
This is the second dress I made (below). I found this fabric that had an asymmetrical pattern - those lovely flowers along one side of the fabric. I got this fabric cheaply because this was damaged - a section of the fabric had a white stripe across. I just cut away that section to make this dress. I wear this dress as a house dress - so comfortable.

Here is the third dress I made - the red paisley pattern fabric. Again, a simple design that I tried to sew as neatly as I possibly can. I wear these dresses when I go out, and soon enough I won’t be buying anymore dresses and will be making my own. All of the fabrics that I use are light and sheer so they are easy to wash and dry. They are also inexpensive fabrics. They are printed cotton, printed rayon or artificial silk. The most expensive fabric I’ve used is Italian Silk - incredibly difficult to work with!

I got two fabrics of Italian Silk. When I started working with it I realised it was impossible. The fabric was so soft and so light that it just kept moving about uncontrollably. What I decided to do was get a lining to put under the fabric, making it much easier to work with. I got cheap taffeta fabric, perfectly crisp to control the Italian Silk! Here’s the finished dress. I wanted it to be a halter dress but that didn’t work out. I will try making a halter dress another time. I’m reasonably happy with this finished dress - added beads to the straps and folded the taffeta over to make solid-colour pipings along the neckline and armholes. I worked hard on this dress and I’m just so glad I didn’t ruin the fabric!

Here’s the red paisley dress worn with The Angeluciene Whandoor choker. That’s the Christmas Reindeer and some more fabric that I got from Island City Mall in Tagbilaran City. I found more fabrics - so beautiful prints - called “Gina Silk” (sometimes called “Dyna Silk”) costing about PhP45 per meter at 60 inches width. I got two meters which is more than enough for my size! The pattern of these fabrics are just so beautiful - yes, cheap silk fabric like these are often used to make curtains, but I love the pattern so much I prefer to wear the curtains!

A closer look at the new fabrics and Rudolph. I wanted to get more fabric but I tried to control myself. I must use these (and several other fabrics I still have in my ‘stash’) before getting new ones. I also still have fabrics leftover from finished projects. Going to a fabric shop is like going to a yarn shop. But no, I’m not getting new fabrics (or new yarns). I have to use up what’s in my stash (I’ve also done some rush crocheting last Christmas)!

The nicest thing about these simple dresses with thin straps is that if it’s a bit cooler, I wear them with the crocheted tops and boleros that I’ve made. Crocheted tops and boleros go perfectly well with such dresses. Crochet fabric often have large holes in them so I need to wear something underneath or use a lining. Wearing the crochet over a sheer dress is the best way. I can mix and match colours and designs.
My fifth dress is a bit different. I didn’t use straps for this one. I copied the design from a sleeveless blouse that I got several years ago from the second-hand clothes shop (a wonderful place for sewing and DIY projects!) When I use a garment as a model I don’t take it apart. I just trace around it. I know it’s very primitive but that’s what I do and it works for me. My clothes don’t require a lot of shaping because I’m very thin. However, I’ve been looking at dressmaking books and while I can’t fully understand the patterns, I’d like to give those a try one day.

Here’s the fabric I used to make the dress. On top of the fabric is the sleeveless blouse I’ve used as a model. It’s a beautiful blouse of sheer grey embroidered silk with the label “United Colours of Benetton.” I followed the shape of this blouse but didn’t manage to make the darts at the bust and at the back. But yes one of these days I am going to have to learn how to do those and experiment more with shaping! I’d also like to learn to make sleeves and collars.

When I get much better at this, I’d like to make dresses for other people. Perhaps start with dresses for children. I hope these photos inspire you to give hand-sewing a try. I never imagined that this was something that I could do, especially if I thought about how much faster it is to finish these dresses if I had a sewing machine. But since completing my first hand-sewn dress I thought that the time it took to make a dress was well worth it. It is relaxing. I’ve also become much faster at sewing and could actually finish a dress in a day or two. What takes a bit longer is making a new design.
Here’s the rest of my hand sewing projects. Time to start new ones, and will make them better following advise from everyone here - especially about darts! :)
MY HAND-SEWING PROJECTS (Skirts and Blouse)
One of the easiest hand-sewn garment project is perhaps a skirt, especially a wrap-skirt. If you’re keen on making a garment by hand then a wrap-skirt is a good start. It’s just a rectangular piece of fabric, wide enough to go around your hips and overlap halfway, and of the length that you desire. My skirt is about mid-calf in length. I tried to sew the seams and waistband as neatly as possible. The hard part was making the hole where the ties go through. I tried to do it as neatly as possible but it wasn’t easy.

The hole is basically like a buttonhole. I could’ve put a piece of fabric over this hole and sewed around it to make the hole stronger. However I didn’t think of that until later. I am hoping that sewing all around the hole like this would be okay. I looked at buttonholes in clothes to figure out how to do this. Of course, machines were used to make the buttonholes of those clothes. I enjoyed making this hole though and I’d probably do it much neater next time.

The fun part of this project was the ties. I used a long piece of fake leather string, crocheted the ties with it, and made a knot at the end of the ties. Then I sewed the ties into the waistband of the wrap-skirt. The ties go all around my hips which holds the skirt securely and also looks like a leather belt. I like how the skirt turned out but it can be done much better next time. One thing I’d definitely need to make next time are darts to give the skirt better shaping.

Here’s another skirt project that I made because of a mistake. I was going to make a dress with this fabric and was using a sleeveless blouse as model. I made the mistake of making the dress a bit tight at the waist and hips. So I ended up cutting the dress in half and making a skirt (and a blouse). I also decided to play around a bit more with this skirt and crochet some lace for the hem and the waistband.

I worked extra hard on this skirt, not only because of the crocheting, but really because I made a lining and darts to shape this skirt. I made the darts for both the skirt and the lining, then I put ties through the crocheted waistband. This skirt took quite a while to finish because I kept making adjustments until I was pleased with it. I’m reasonably happy with this skirt however, what I really want in a skirt is something that flows smoothly and softly, with a slightly wavy hem. Well, that’s something to work on in the future.

Here are more photos of the skirt, showing more closely the crochet and sewing work - starting with a simple shapeless skirt, then working the crochet trims, the lining and the ties. I tried to keep my sewing as neat as possible. You can see the stitches in the photo. There is charm in hand-sewn garments which I really quite adore.


Now here’s the other half of that failed dress - my sleeveless blouse. This blouse was modelled after the grey sleeveless blouse that I used earlier for some of my dress projects. This photo shows the blouse that I made together with the ‘model.’ The model is a sheer grey embroidered silk with the label “United Colours of Benetton.” I haven’t managed to copy the darts at the bust and back of the model - something to learn to do next time.

Here’s the finished blouse. This tends to slip upwards then I sit down, the neckline goes to my chin! I will need to alter this - add darts perhaps - for a better fit. Seems I could get away with no darts when it comes to dresses, because the weight of the dress allows a good fit - but not so with blouses!

I still have small pieces of fabric leftover from previous projects that can be made into blouses like these since this type of blouse doesn’t use a lot of fabric. Perhaps I can also modify the design a bit, change the neckline, try a French sleeve, a halter top would be nice too.
MY HAND-SEWING PROJECTS (Dresses)
Lately, I started sewing by hand. I love it - it is meditative and relaxing. I love going to the fabrics shop, looking for beautiful fabrics to work with. My very first sewing project was a dress. I used an old dress (a favourite of mine) which I got from a second-hand clothes shop as model. I placed the dress over my fabric and traced all around it. I didn’t have a tailor’s chalk. I just used a felt-tip pen. I made three dresses from this method. Soon I got some Manila paper and traced over it and cut it as my pattern. I modified the design by modifying this paper pattern. However, recently I have found it easier to create the design directly on the fabric I am working with.

Here is my first hand-sewn dress (above). I love this fabric of paisley pattern, absolutely beautiful. I searched the shops for paisley pattern fabrics and found only two that I really liked, this one in blue and the other one in red. I did my best to sew this dress as neatly as possible, including the seams on the wrong side of the dress. Everything has to be done neatly otherwise the fabric will fray and the dress will be ruined.
This is the second dress I made (below). I found this fabric that had an asymmetrical pattern - those lovely flowers along one side of the fabric. I got this fabric cheaply because this was damaged - a section of the fabric had a white stripe across. I just cut away that section to make this dress. I wear this dress as a house dress - so comfortable.

Here is the third dress I made - the red paisley pattern fabric. Again, a simple design that I tried to sew as neatly as I possibly can. I wear these dresses when I go out, and soon enough I won’t be buying anymore dresses and will be making my own. All of the fabrics that I use are light and sheer so they are easy to wash and dry. They are also inexpensive fabrics. They are printed cotton, printed rayon or artificial silk. The most expensive fabric I’ve used is Italian Silk - incredibly difficult to work with!

I got two fabrics of Italian Silk. When I started working with it I realised it was impossible. The fabric was so soft and so light that it just kept moving about uncontrollably. What I decided to do was get a lining to put under the fabric, making it much easier to work with. I got cheap taffeta fabric, perfectly crisp to control the Italian Silk! Here’s the finished dress. I wanted it to be a halter dress but that didn’t work out. I will try making a halter dress another time. I’m reasonably happy with this finished dress - added beads to the straps and folded the taffeta over to make solid-colour pipings along the neckline and armholes. I worked hard on this dress and I’m just so glad I didn’t ruin the fabric!

Here’s the red paisley dress worn with The Angeluciene Whandoor choker. That’s the Christmas Reindeer and some more fabric that I got from Island City Mall in Tagbilaran City. I found more fabrics - so beautiful prints - called “Gina Silk” (sometimes called “Dyna Silk”) costing about PhP45 per meter at 60 inches width. I got two meters which is more than enough for my size! The pattern of these fabrics are just so beautiful - yes, cheap silk fabric like these are often used to make curtains, but I love the pattern so much I prefer to wear the curtains!

A closer look at the new fabrics and Rudolph. I wanted to get more fabric but I tried to control myself. I must use these (and several other fabrics I still have in my ‘stash’) before getting new ones. I also still have fabrics leftover from finished projects. Going to a fabric shop is like going to a yarn shop. But no, I’m not getting new fabrics (or new yarns). I have to use up what’s in my stash (I’ve also done some rush crocheting last Christmas)!

The nicest thing about these simple dresses with thin straps is that if it’s a bit cooler, I wear them with the crocheted tops and boleros that I’ve made. Crocheted tops and boleros go perfectly well with such dresses. Crochet fabric often have large holes in them so I need to wear something underneath or use a lining. Wearing the crochet over a sheer dress is the best way. I can mix and match colours and designs.
My fifth dress is a bit different. I didn’t use straps for this one. I copied the design from a sleeveless blouse that I got several years ago from the second-hand clothes shop (a wonderful place for sewing and DIY projects!) When I use a garment as a model I don’t take it apart. I just trace around it. I know it’s very primitive but that’s what I do and it works for me. My clothes don’t require a lot of shaping because I’m very thin. However, I’ve been looking at dressmaking books and while I can’t fully understand the patterns, I’d like to give those a try one day.

Here’s the fabric I used to make the dress. On top of the fabric is the sleeveless blouse I’ve used as a model. It’s a beautiful blouse of sheer grey embroidered silk with the label “United Colours of Benetton.” I followed the shape of this blouse but didn’t manage to make the darts at the bust and at the back. But yes one of these days I am going to have to learn how to do those and experiment more with shaping! I’d also like to learn to make sleeves and collars.

When I get much better at this, I’d like to make dresses for other people. Perhaps start with dresses for children. I hope these photos inspire you to give hand-sewing a try. I never imagined that this was something that I could do, especially if I thought about how much faster it is to finish these dresses if I had a sewing machine. But since completing my first hand-sewn dress I thought that the time it took to make a dress was well worth it. It is relaxing. I’ve also become much faster at sewing and could actually finish a dress in a day or two. What takes a bit longer is making a new design.
Here’s the rest of my hand sewing projects. Time to start new ones, and will make them better following advise from everyone here - especially about darts! :)
MY HAND-SEWING PROJECTS (Skirts and Blouse)
One of the easiest hand-sewn garment project is perhaps a skirt, especially a wrap-skirt. If you’re keen on making a garment by hand then a wrap-skirt is a good start. It’s just a rectangular piece of fabric, wide enough to go around your hips and overlap halfway, and of the length that you desire. My skirt is about mid-calf in length. I tried to sew the seams and waistband as neatly as possible. The hard part was making the hole where the ties go through. I tried to do it as neatly as possible but it wasn’t easy.
The hole is basically like a buttonhole. I could’ve put a piece of fabric over this hole and sewed around it to make the hole stronger. However I didn’t think of that until later. I am hoping that sewing all around the hole like this would be okay. I looked at buttonholes in clothes to figure out how to do this. Of course, machines were used to make the buttonholes of those clothes. I enjoyed making this hole though and I’d probably do it much neater next time.

The fun part of this project was the ties. I used a long piece of fake leather string, crocheted the ties with it, and made a knot at the end of the ties. Then I sewed the ties into the waistband of the wrap-skirt. The ties go all around my hips which holds the skirt securely and also looks like a leather belt. I like how the skirt turned out but it can be done much better next time. One thing I’d definitely need to make next time are darts to give the skirt better shaping.

Here’s another skirt project that I made because of a mistake. I was going to make a dress with this fabric and was using a sleeveless blouse as model. I made the mistake of making the dress a bit tight at the waist and hips. So I ended up cutting the dress in half and making a skirt (and a blouse). I also decided to play around a bit more with this skirt and crochet some lace for the hem and the waistband.

I worked extra hard on this skirt, not only because of the crocheting, but really because I made a lining and darts to shape this skirt. I made the darts for both the skirt and the lining, then I put ties through the crocheted waistband. This skirt took quite a while to finish because I kept making adjustments until I was pleased with it. I’m reasonably happy with this skirt however, what I really want in a skirt is something that flows smoothly and softly, with a slightly wavy hem. Well, that’s something to work on in the future.

Here are more photos of the skirt, showing more closely the crochet and sewing work - starting with a simple shapeless skirt, then working the crochet trims, the lining and the ties. I tried to keep my sewing as neat as possible. You can see the stitches in the photo. There is charm in hand-sewn garments which I really quite adore.


Now here’s the other half of that failed dress - my sleeveless blouse. This blouse was modelled after the grey sleeveless blouse that I used earlier for some of my dress projects. This photo shows the blouse that I made together with the ‘model.’ The model is a sheer grey embroidered silk with the label “United Colours of Benetton.” I haven’t managed to copy the darts at the bust and back of the model - something to learn to do next time.

Here’s the finished blouse. This tends to slip upwards then I sit down, the neckline goes to my chin! I will need to alter this - add darts perhaps - for a better fit. Seems I could get away with no darts when it comes to dresses, because the weight of the dress allows a good fit - but not so with blouses!

I still have small pieces of fabric leftover from previous projects that can be made into blouses like these since this type of blouse doesn’t use a lot of fabric. Perhaps I can also modify the design a bit, change the neckline, try a French sleeve, a halter top would be nice too.
Comments
Post a Comment