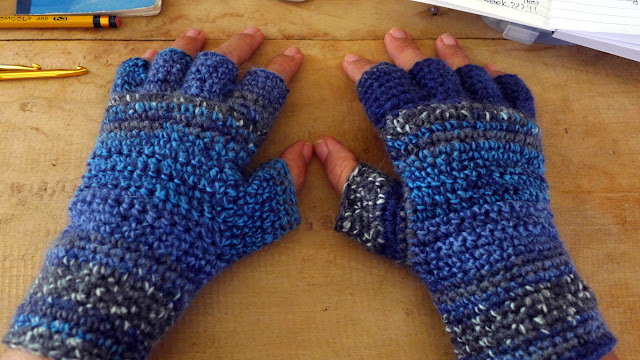
For
this project I used SuperSock by Ice Yarns. The yarn is quite fine (it is fingering weight yarn at 400 meters in 100 grams) so
I used two strands held together and a 4mm crochet hook. Here is a
documentation of how I made a pair of fingerless gloves. The number
of stitches you need will depend on your own size. Remember to
take note of the number of rounds and stitches you use since you will
be making a second glove in the exact same manner.
Start
at the top
Start
at the top of your hand just at the base of the fingers. Crochet a
long chain and sl st to make a ring that is large enough to fit
around the hand – not too loose and not too tight.
Crochet
several rounds of sc sts until you reach the inner base of the thumb.
At this point you will need to work a gap for the thumb. You do this
by working in rows instead of rounds. Remember to write down
the number of stitches and rounds/rows for reference when making the
other glove!!
Work
the opening for the thumb
Start
working in rows to make the opening for the thumb. When you reach the
outer base of the thumb, resume working in rounds.
Work
in rounds until you reach the desired length
Continue
working in rounds until you reach the desired length of the glove.
Next we will make the fingers.
Use
stitch markers
Use
stitch markers to indicate the spaces between the fingers. Use 3
stitch markers. I use yarn of different colour as marker and placed
the 3 markers on one side of the glove. You can use 6 stitch markers
if you wish to define the spaces in both sides of the glove.
Making
holes for the fingers one at a time
Join
yarn to corner of top of glove. Work sc into each sc over one side of
the glove until you reach the first stitch marker on the other side.
Make a dc to join to the corresponding st on the other side of the
glove. This makes a hole for one finger. Continue with sc until you
reach the next stitch marker then make a dc joining to the
corresponding st on the other side of the glove. This makes a hole
for the next finger. Continue in this manner until you reach the
first sc made and join with a sl st. You now have 4 holes for
fingers. Don't fasten off, you can continue crocheting the first
finger.
Crocheting
each finger
To
crochet each finger you will need to work in rounds around each hole.
Each finger also needs to taper a bit towards the tips. In my case,
for the index finger, I started with 14 sc for 4 rounds, then dec 2
sts at round 5 to make 12 sc, and at round 6, a final round of 12 sc.
Try on the glove as you work to test the fit. When satisfied, fasten
off. The middle finger is worked in the same way. The ring finger and
little finger are crocheted similarly but with less number of
stitches. In my case, I started with 12 sc and decreased to 10 sc at
the fifth and sixth rounds.
For
me, the trickiest part here is crocheting the sc between the fingers.
It gets rather crowded in that area, one just needs to insert the
hook between the sc sts of the previous finger.
Here,
you can also decide whether you'd want shorter or longer or full
fingers for your glove. You can fasten off after one round of sc for
each finger for truly fingerless gloves. If you want to make full
gloves, you'll need to decrease towards the tip of each finger and
close off the tips of the fingers.
Work
around the thumb
Sc
rounds are worked around the hole for the thumb, working one sc in
each row. In my case, I had 20 sc all around. This is worked for 4
rounds, then round 5 is decreased to 16 sc, and crocheted in this
number of sts for the last 3 sts for a total of 8 rounds. Fasten off.
Weave in all ends.
Make
the other glove in the same way. I hope you remembered to take note
of the number of rounds and stitches used for the first glove!!! Good
luck! Happy crocheting!


Comments
Post a Comment