Pavel’s Tressiviolinger

PAVEL’S TRESSIVIOLINGER | This is a crocheted bolero made up of square motifs. I would recommend this pattern to Intermediate and Advanced Crocheters, or crocheters wishing to use and modify motifs to construct a garment. This pattern is written for small size (30″-32″ Bust) and uses only a single skein of yarn (100 grams/about 400 meters). I have included crochet symbol charts for the pattern which may be useful for crocheters interested in modifying the pattern. “Pavel’s Tressiviolinger” is intended to encourage crocheters to make their own garments using some basic principles of using and modifying motifs. In fact, the motifs used in this pattern are from a crocheted stole. The name “Pavel’s Tressiviolinger” is a bit of a play on Ravel’s “Bolero” with the neologism “Tressiviolinger” lifted from a poem I wrote with the help of an n-gram generator.
“Pavel’s Tressiviolinger” is a crocheted bolero. I made it from a single skein of yarn, 100 grams or about 425 meters. The photo above shows the completed bolero and some yarn leftover. “Pavel’s Tressiviolinger” is made up of square motifs joined together. Half motifs are used underneath the sleeves, near the armpits. The finished bolero fits me, a small size about 32 inches bust. With some yarn leftover I believe it is possible to make a bolero of size medium, about 34 inches bust. To make a bigger bolero, you’ll need more motifs and/or use a larger hook. I don’t have the pattern instructions for a bolero of bigger size but if you are an experienced garment crocheter, you should be able to make the bolero in bigger sizes using the basic instructions for the motifs.
The challenge in writing this pattern is to come up with a garment using a single skein of yarn. I love how “Pavel’s Tressiviolinger” turned out. Using sock yarn was also a good idea because this yarn stretches quite a bit. This allowed me to make a bolero that fitted quite nicely on the body. If you’re substituting yarn for this pattern, try to get something that has a bit of ‘give’, something that stretches.
The other challenge in “Pavel’s Tressiviolinger” is to use square motifs in the construction of a bolero. A method of joining the motifs needs to be established. Then to achieve a good shaping, half versions of the motifs are needed. To shape the neckline and ends of sleeves, a crochet trim is necessary. With these basic principles, you can use almost any square motif to make a bolero of your own design.
Tressiviolonger (Crocheted Bolero)
Yarn: TOFUtsies by SWTC (50% Superwash Wool, 25% Soysilk Fibers, 22.5% Cotton, and 2.5% Chitin); Yarn Weight: Light Fingering (UK 3 ply)
Hook: 3mm
Terminology: US Crochet Terminology

Special Stitches:
Center Ring: Leave about 6” tail, wrap yarn into a ring around your finger like a slip knot. Insert hook into ring. Yarn over hook, pull up a loop. Proceed to work the first round of stitches into the ring as instructed.
Dc2tog (double crochet two together): Yarn over, insert hook in first stitch, pull up loop, yarn over and pull through 2 loops on hook; yarn over, insert hook in second stitch, pull up loop, yarn over and pull through 2 loops on hook; yarn over and pull through 3 loops on hook.
Dc3tog (double crochet three together): Yarn over, insert hook in first stitch, pull up loop, yarn over and pull through 2 loops on hook; yarn over, insert hook in second stitch, pull up loop, yarn over and pull through 2 loops on hook; yarn over, insert hook in third stitch, pull up loop, yarn over and pull through 2 loops on hook; ok; yarn over and pull through 4 loops on hook.
Picot: Ch 3, sl st in first ch. picot made.


Instructions:
Motif:
Rnd 1: Make a Center Ring. Ch 3, 2 dc in ring, *ch 5, 3 dc in circle; rep fr * two more times; ch 5, join with sl st in top of 3-ch.
Rnd 2: Ch 3, dc2tog in next 2 dc, *ch 5, 5 dc in 5-ch loop, ch 5, dc3tog in next 3 dc; rep fr * two more times; ch5, 5 dc in next 5-ch loop, ch 2, dc in top of dc2tog to join.
Rnd 3: Ch 1, sc around dc just made, *ch 5, sc in next 5-ch loop, ch 5, dc3tog in first 3 dc of 5-dc group, ch 3, dc3tog in ast of 3 dc of same 5-dc group, ch 5, sc in next 5-ch loop; rep fr * two more times; ch 5, sc in next 5-ch loop, ch 5, dc3tog in first 3 dc of 5-dc group, ch 3, dc3tog in last 3 dc of same 5-dc group, ch 2, dc in first sc to join.
Rnd 4: Ch 1, sc around dc just made, *ch 7, sc in next 5-ch loop, ch 9, sl st in sc just made, ch 7, sc in next 5-ch sp, ch 3, sc in next 3-ch sp, picot, ch 3, sc in next 5-ch loop; rep fr * two more times; ch 7, sc in next 5-ch loop, ch 9, sl st in sc just made to make a loop, ch 7, sc in next 5-ch loop, ch 3, sc in next 3-ch sp, picot, ch 3, sl st in first sc to join. Fasten off.

Make the next motif and join as follows:
Rnd 1-3: As instructions for motif above.
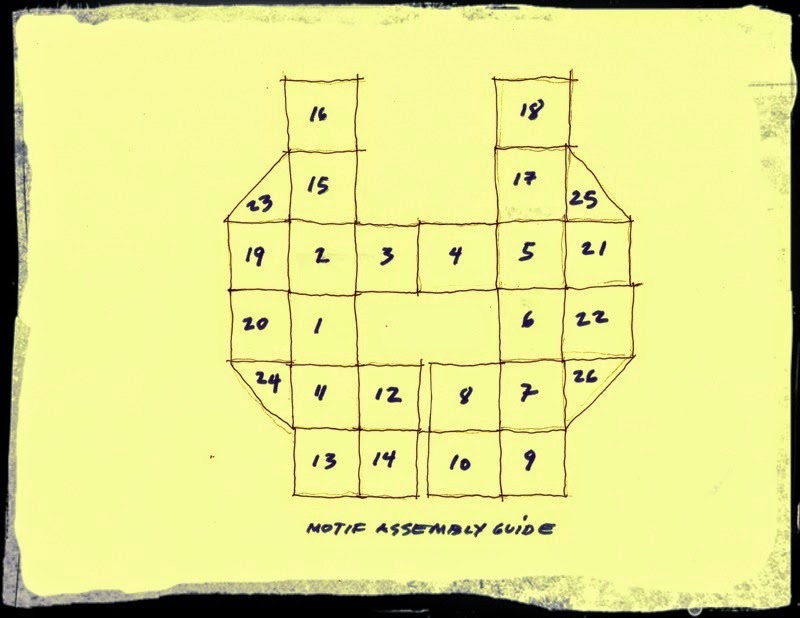
Rnd 4: Ch 1, sc around dc just made, ch 7, sc in 5-ch loop, ch 4, sl st in 9-ch loop of previous motif, ch 4, sl st in sc of working motif, ch 3, sl st in next 7-ch loop of previous motif, ch 3, sc in next 5-ch loop of working motif, ch 3, sc in 3-ch sp of working motif, ch 1, sl st in picot of previous motif, ch 1, sl st in sc of working motif, ch 3, sc in next 5-ch loop of working motif, ch 3, sl st in 7-ch loop of previous motif, ch 3, sc in next 5-ch loop of working motif, ch 4, sl st in 9-ch loop of previous motif, ch 4, sl st in sc of working motif; continue to complete the motif or to complete joining motifs as necessary. Refer to Assembly Diagram below.


Making the Half Motif for the Sleeves (Make 4):
Row 1: Make a Center Ring. Ch 3, dc in ring, ch 5, 3 dc in ring, ch 5, 2 dc in ring; ch 3, turn.
Row 2: Dc in second dc, ch 5, 5 dc in 5-ch loop, ch 5, dc3tog in next 3 dc, ch 5, 5 dc in 5-ch loop, ch 5, dc2tog over last 2 dc; ch 5, turn.
Row 3: Sc in 5-ch loop, ch 5, dc3tog over first 3 dc of 5-dc group, ch 3, dc3tog over last 3 dc of same 5-dc group, ch 5, sc in 5-ch loop, ch 5, sc in next 5 ch loop, ch 5, dc3tog over first 3 dc of next 5-dc group, ch 3, dc3tog over last 3 dc of same 5-dc group, ch 5, dc in 5-ch loop, ch 2, dc in top of last dc; ch 4, turn.
Row 4: Continue with Row 4 by joining the half motif to the motifs on the sleeve and body of the bolero following joining instructions above.

Finishing:
Sew side seams of the bolero if side motifs have not been joined. Crochet two rows all around the edges of the bolero as shown in the crochet chart below, then crochet two rows of treble and single crochet stitches along the bottom of the bolero. Make trim for the sleeve. Sleeve should puff a little. Refer to Crochet Charts. Sew button on front of bolero. Weave in all ends, including tails of centre rings.

Comments
Post a Comment